ELK完全安裝手冊
tags: elk elastic logstash kibana
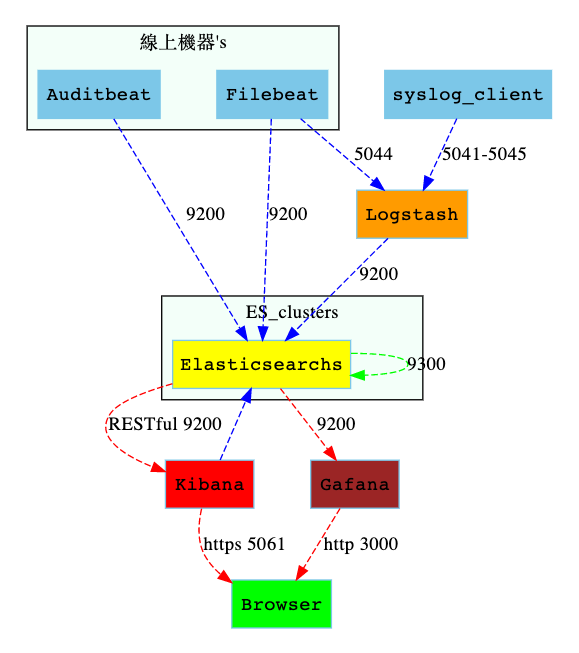
💹ELK完全安裝手冊
XXXbeat = 事件發送裝置
Logstash = 事件處理裝置
Elasticsearchs = 搜索引擎
Gafana,Kibana = 使用者瀏覽+操作介面端
配合 ELK安全性 可以得知中間每一條虛線都可以加密,且圍繞著Elasticsearch有帳密驗證
事件如果不需要==額外==處理,可以直接跳過事件處理裝置直接送到搜索引擎
紅色GET
藍色POST
subgraph cluster_shiper{
label=”線上機器’s”;
bgcolor=”mintcream”;
Filebeat;
Auditbeat
}
subgraph cluster_es{
label=”ES_clusters”;
bgcolor=”mintcream”;
Elasticsearchs
}
Elasticsearchs[style=”filled”,fillcolor=”yellow”]
Browser[style=”filled”,fillcolor=”green”]
Logstash[style=”filled”,fillcolor=”orange”]
Kibana[style=”filled”,fillcolor=”red”]
Gafana[style=”filled”,fillcolor=”brown”]
Elasticsearchs->Elasticsearchs[color=”green”][label=”9300”];
Logstash->Elasticsearchs[label=”9200”];
Filebeat->Logstash[label=”5044”];
syslog_client->Logstash[label=”5041-5045”];
Filebeat->Elasticsearchs[label=”9200”];
Auditbeat->Elasticsearchs[label=”9200”];
Kibana->Elasticsearchs;
Elasticsearchs->Kibana[color=”red”][label=”RESTful 9200”];
Elasticsearchs->Gafana[color=”red”][label=”9200”]
Kibana->Browser[color=”red”][label=”https 5061”]
Gafana->Browser[color=”red”][label=”http 3000”]
}
Elastic Stack License
ELK7版以後內建有基本的安全性設定及部分額外功能,額外功能都需綁定開啟安全性。因此強烈推薦開啟安全性設定。
文章內使用到的為Basic版開啟認證系統節點中通訊加密採用 SSL
有關版本差異
X-Packs
安裝 Elasticsearchs
| IP1 | IP2 | Http Port(ES HTTP API) | Transport Port(ES叢集内部通信用) | nodename |
|---|---|---|---|---|
| 10.10.9.247 | 10.20.30.247 | 9200 | 9300 | tribe-node |
| 10.10.9.47 | 10.20.30.47 | 9200 | 9300 | node-1 |
| 10.10.9.48 | 10.20.30.48 | 9200 | 9300 | node-2 |
| 10.10.9.49 | 10.20.30.49 | 9200 | 9300 | node-3 |
| 10.10.9.50 | 10.20.30.50 | 9200 | 9300 | node-4 |
| 10.10.9.51 | 10.20.30.51 | 9200 | 9300 | node-5 |
| 10.10.9.52 | 10.20.30.52 | 9200 | 9300 | node-6 |
- ansible
- docker
- dnf-RPM
下載匯入PGP Key
rpm --import https://artifacts.elastic.co/GPG-KEY-elasticsearch |
新增elastic stack repo /etc/yum.repos.d/elastic.repo
[elasticsearch] |
啟用repo
sudo dnf install --enablerepo=elasticsearch elasticsearch |
systemd enable
sudo /bin/systemctl daemon-reload |
系統設定
https://www.elastic.co/guide/en/elasticsearch/reference/current/system-config.html
Disable swapping
- Disable all swap files
sudo swapoff -a
sudo vim /etc/fstab #掉swap mount的部分 - Enable bootstrap.memory_lock in
elasticsearch.ymlelasticsearch.yml bootstrap.memory_lock: true
- ulimits
/etc/security/limits.conf/etc/security/limits.conf # allow user 'elasticsearch' mlockall
elasticsearch soft memlock unlimited
elasticsearch hard memlock unlimitedIncrease file descriptors
- ulimits
/etc/security/limits.conf/etc/security/limits.conf elasticsearch - nofile 65535
Ensure sufficient virtual memory
- sysctl
/etc/sysctl.conf/etc/sysctl.conf vm.swappiness=1
vm.max_map_count=262144sudo sysctl -p
Ensure sufficient threads
- ulimits
/etc/security/limits.conf/etc/security/limits.conf elasticsearch - nproc 4096
Elasticsearch 基礎概念
Cluster
叢集 由一台或多台的Elasticsearch 節點(Node)組成
Node
節點 即為Elasticsearch的服務本身 同一台機器上啟動兩個Elasticsearch服務(docker or 不同port) 就是兩個node
Index
索引 具有相同結構的文檔集合體 類似關連式database本身 每一個節點內可以有多個索引
Document
文檔 Elasticsearch中最小的儲存單元 JSON數據格式 複數Document組合而成索引 文檔類似關聯式database中表內一筆記錄。
Shard
分片又稱Primary shard
單個索引切分成多個shard,分佈在多台Node節點上存儲。可以利用shard很好的橫向擴展,以存儲更多的數據,同時shard分佈在多台node上,可以提升集群整體的吞吐量和性能。在創建索引的時候可以直接指定分片的數量即可,一旦指定就不能再修改了。
Replica
分片副本又稱Replica shard
跟主shard的內容一樣 一個shard可以有一個或者多個replica 作用是同主分片一同分散在各節點內以提高冗餘並增加讀搜尋速度(類似raid的概念)